With this blog, I will start a series of 3 blogs explaining some important facts about using filters in landscape photography. In the first part, I will talk about the technical aspects of different filters, such as UV and polarisation filters. In part 2 (to be published soon), I will focus on neutral density filters as useful tools for the creative landscape photographer, and then soon afterwards, in part 3, I will end with graduated filters. This first part might be a bit more theoretical, but parts 2 and 3 will be more practical for you as a landscape photographer. So, keep tuned into my website in the coming weeks.
Types of filters in landscape photography
In the vocabulary of landscape photographers, you will encounter many types of filters: UV filters, polarizing filters, neutral density filters, graduated ND filters …
Like so many things in life, there are cheap systems and very expensive brands on the market, each with its advantages and disadvantages. The differences are in durability and the possible colour cast that they can cause.
I don’t think the colour cast a filter can cause is the biggest problem, as long as they are uniform all over the surface. My Lee filters give a slightly colder blue cast, but in the kind of pictures I take, this is often no problem. And if I don’t want it, I can get rid of it in one click in the RAW converter in Lightroom or Photoshop.
Below I discuss the different shapes and materials of filters that you as a landscape photographer will want to use sooner or later.
You can choose from the filter, resin, or glass versions. Resin filters are cheaper and light but extremely sensitive to scratches. They also seem to suffer a bit more from condensation, and the quality of some brands of resin filters is lower than that of glass. I choose glass, even though it can break easily if you drop it. But by putting a cheap, moderate filter on an expensive, sophisticated camera and lens, you immediately reduce the value of the whole system.
Two main types of filters are available: screw-on and slot filters.
Screw-on filters
The screw-on filters are screwed onto the thread in front of your lens. They do not require additional mounting accessories, just a threaded lens to screw in filters. This is, of course, not possible on a compact camera, but it is on a DSLR (Digital Single Lens Reflex Camera).
The only lenses that cannot use this type of filter are ultra-wide-angle lenses or fisheye lenses, where the curvature of the first lens element is very pronounced and protruding.
The main advantage of these types of filters is that they prevent the leakage of light between the filter and the lens, a problem that sometimes exists with slot-in filters
These filters allow stacking so that you can use them simultaneously. But there are some reasons not to do so:
- This is not always practical and fast. If you have to refocus, you can’t quickly remove the screw-in filter and reposition it
- The transition of the grey gradient filter is always in the middle, which often limits the composition.
- Stacking filters introduces the problem of vignetting on wide-angle lenses. The outer edge of your filter then goes forward and becomes as if it were a tube.
- For each lens size, you will need a filter of different sizes.
Of course, if you only have one lens with a specific diameter, that is no problem. It also allows for working light and compact. Otherwise, “step-up” rings will enable you to attach a larger filter to a smaller lens.
If you do not need to use Graduated ND filters (gradient filters, see part 3 of these blogs) and you always work with the same lens, the screw-on filter is a perfect choice. This solution works fine if you only photograph waterfalls, rivers in forests, or places where there is no significant difference in the light between different parts of the scenery. But do you always have that choice?
Slot-in filters
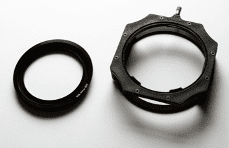
The slot-in filters are the second group of filters. They cannot be screwed to the lens, but instead, they require two unique accessories: an adapter ring and a holder.
The adapter ring is a special threaded ring that attaches to the thread of your lens (much like a screw-on filter). This ring is needed to mount the holder to the lens, not to attach filters. You might need a different adaptor for different lens sizes. Then, the holder will be attached to the adapter ring.
Plug-in or slot-in filters (and the adapter ring and holder) are generally more expensive compared to the screw-in solution, but they still have a few critical advantages for landscape photographers:
- One filter set is sufficient and can be placed via adapter rings on all lenses
- You can install multiple filters without the problem of vignetting
- It gives little or no vignetting because the filter surface is usually larger than your lens diameter
- On-site filter replacement is really quick and easy
- Some plug-in filters are not available as a screw filter
- Very flexible in use. You can position the filter perfectly (higher, lower, oblique) depending on the composition
- If you use ultra-wide lenses, you can still use filters with a particular holder system
- If you use GND filters, the plug-in solution is unavoidable.
These types of filters belong to a higher price range. But they will last for years.
The most common plug-in systems support 100mm filters, primarily designed for DSLRs with wide-angle to telephoto lenses.
There are many manufacturers of adapter rings and holders. I use Lee filters, but there are also other brands available. The holder and filters must not necessarily be from the same brand. Combining a holder from one brand with filters from another brand is possible. Of course, you have to use filters of the same size.
UV-filters
The UV filter’s advantage was protecting the film from UV rays, but today, this feature is already integrated into your camera. For this reason, this filter is often only used as a lens protector against scratches and dirt. But if you put a lens hood on your lens, the UV filter has little added value, and the lens is also protected against impact or scratches.
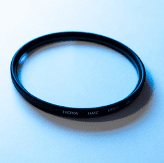
I no longer use these filters because other filters protect the lens as much, but mainly because each filter reduces the light however slightly, and I fear that some of those UV filters don’t use high-quality glass.
Polarisation filters
The last group of filters that I want to discuss in this blog are polarizing filters. They are often undervalued, but I still think they belong in any landscape photographer’s photo bag.
Polarizing filters are used in landscape photography to remove annoying reflections from water, glass, metal, and wet objects, darken blue skies to increase the contrast in the clouds, and generally promote contrasts and increase the saturation of colours. They usually give your landscape photo a slightly warmer tint. You cannot reproduce the effect of a polarizing filter in post-processing.
This filter eliminates specific frequencies from the visible spectrum and only transmits polarised light in a particular direction.
Polarisation effect
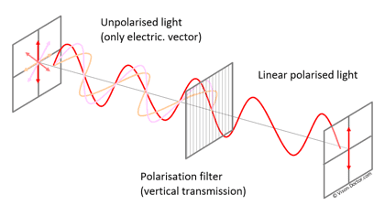
Technically, there are two types of polarizers: circular and linear. The difference lies in the filter’s working principle. However, linear polarizers do not work with your DSLR’s autofocus. Therefore, we will use circular polarizers as an obvious choice.
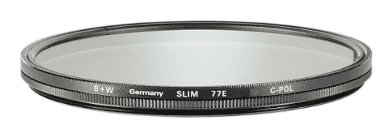
You can have circular polarisers like a screw-in filter that you put in front of your lens. And there are versions you can screw in front of your slide-in filter holder. I use both types.
A rotating polarizer is made of two metal frames and two glass surfaces. The first frame is screwed on the screw threads of the lens like any screw-on filter; the second (the outer one) connects to the first. With this, you can modify the orientation of the polarization and, in that way, control the intensity of the reflection reduction.
Polarizing filters are handy. Nevertheless, I want to summarize here some of their disadvantages and add some recommendations:
- They stop about two or even three stops of light. Keep this in mind when you calculate to achieve a correct exposure and when combining them with other filters.
- Polarizers are expensive filters.
- They require the camera to be pointed at a right angle to the sun for optimal effect (i.e. when the sun is on your left or right). The more the angle decreases, the more the impact of the filter drops. Therefore, using them for panoramic photos is difficult because you get different results from different angles.
- Composing your image might take slightly longer as you need to rotate the elements to achieve the desired effect.
- Sometimes, seeing the effect when using the camera’s viewfinder can be more difficult.
- The filter should be kept clean to avoid a reduction in image quality.
- If you still want a polarizer, I suggest buying a “slim” version to avoid vignetting, especially in combinations with wide-angle lenses.
- If you want a polarizer and don’t use a slot-in system with an adapter ring and holder, you should buy a polarizer with a diameter equal to that of your lens or one for each different diameter.
I hope you learned something again, and I invite you to comment below. Parts 2 and 3 of this series of blogs for landscape photographers will follow soon, with more information about using neutral density and gradual neutral density filters in landscape photography.
Leave a reply