
Introduction
In all my previous blogs, I have concentrated on all the different aspects of making a photo, considering so many technical and artistic elements. Of course, this will always remain the most crucial phase in creating unforgettable pictures. However, when you come home with your RAW files, a lot can or still has to be done in post-processing.
That is why I decided to write some blogs about post-processing.
And today, I will concentrate on the Skylum product “Luminar NEO”: skylum.evyy.net/DK0gRy
Luminar Neo is one of the most advanced artificial intelligence software programs. It has been available for almost a year and has been upgraded constantly, so it is time for a review.
In this blog, I will concentrate on the package’s features and advantages but also point out some shortcomings here and there. But know that this product is constantly updated, and with each update, more features are added or refined. For example, the most recent update added HDR Merge, Focus Stacking, and Upscale AI.
Luminar Neo can be used as a stand-alone product or as a plugin for LightRoom or PhotoShop. I am using it as a plugin for LightRoom.
For those who find the Adobe formulas or subscriptions too expensive, Luminar Neo is an excellent alternative with plenty of possibilities. In addition, Luminar is available as purchase software even though subscription plans exist. Luminar also has its catalogue function if used stand-alone, although it is less powerful than the Lightroom catalogue and library functions. But it will be more than good enough for most amateur photographers.
For those who are used to working with Lightroom and Photoshop, Luminar Neo offers many extra refined possibilities as a plugin. And it can be fully integrated into your everyday workflow. And more than half of all the tools use AI or artificial intelligence to make things easier for us. So yes, if you master Photoshop and Lightroom well, you could probably achieve the same result. But Luminar Neo will speed up the workflow and processing time since artificial intelligence will automatically analyse your images, use masks, and make some adjustments in seconds and a few clicks.
Luminar has many tools on board that can be very interesting for landscape photographers. Other powerful tools, in turn, are highly suitable for portrait photographers. But rest assured, just about any photography discipline will find beneficial applications in Luminar Neo.
I will walk you through most of the tools in Luminar Neo that could help you as a landscape photographer, but I can’t miss the opportunity to say a few words about portraiture and Lumina Neo.
In the example photos I use in this blog, I will only illustrate the pure effect of some of the tools without further adjustments! Therefore, the result might be slightly exaggerated to my taste in some tools to show the impact explicitly, or the picture could be refined further with more tools. But then, it would be more challenging to see the effect of a single tool.
This blog is an introduction to Luminar Neo’s powerful post-processing capabilities. I might explore the technical aspects further in future blogs.
Content
Portrait background Removal AI
Development
The development module will offer the same possibilities to the landscape photographer as in Lightroom and Photoshop, like contrast, shadows, highlights, luminance, etc. This is interesting for those not working in Lightroom or Photoshop. I will not discuss them in depth here.
Enhance AI
I usually use Enhance AI as one of the first steps in the workflow. This tool has only two sliders: Accent AI and Sky enhancement AI.
Accent AI uses artificial intelligence to analyse your image and make adjustments depending on where the picture needs it most. Accent AI is a series of tweaks and edits applied dynamically to the image. Accent will impact shadows, highlights, contrast, tone, saturation, exposure, details, etc. And all of that is controlled by a single slider. I push the slider back and forth until I like what I see. In many cases, there is no further need to develop the photo, but for the control freak, you can always tweak all of the settings yourself if needed.
Sky enhancement AI will improve your landscape photos’ existing sky, giving the sky more structure and colour. But beware, you can quickly go much too far and overdo things. If you work in Photoshop or Lightroom, there is always the possibility of tuning down the effect of, for example, saturation. For most photos, this will be an ideal starting point. If that isn’t good enough, you can always enlist the help of the Sky replacement AI.
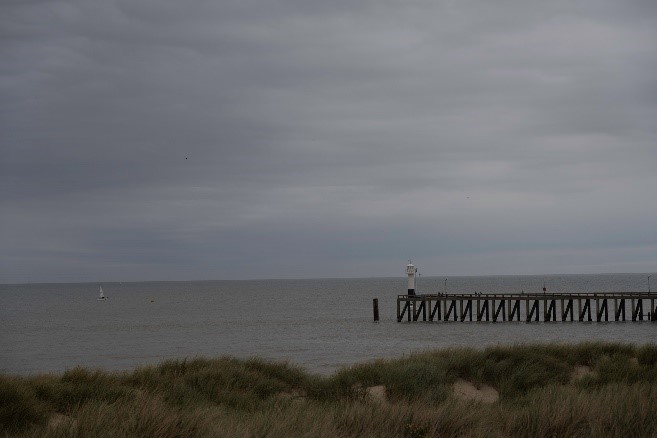
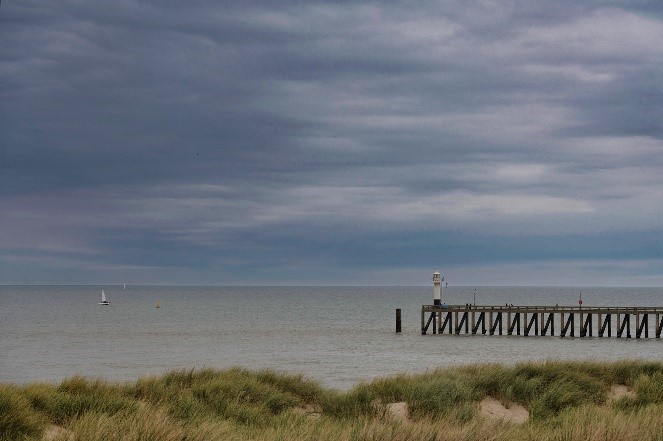
In this seascape photo, I only used Enhance AI (accent and sky improvement), which made a remarkable difference (the original image on the left, after Luminar Neo on the right). Of course, this photo can be improved further in post-processing, but this is to illustrate what can already be achieved with only two sliders.
If you want to learn more about how to give more impact on your photo, have a look at how-to-create-more-impact-in-your-photos
When you are a novice landscape photographer, you will find some helpful tips here: tips-for-the-novice-landscape-photographer
Sky AI
Most professional photographers will try to take a landscape photo under the perfect sky. But, sometimes, returning to the spot under better circumstances is impossible. This happens, for example, when travelling in a group or with your family, and everything is planned according to a fixed schedule without considering the perfect weather conditions or time of the day (sunrise and sunset).
So, you could dream of returning, or why not try Sky AI and replace the sky with another one? Luminar will come with a set of skies, or you can buy additional skies. For real photographers, you can also build up your library of skies and load them into Luminar Neo for future use. I have made a habit of taking pictures every time I see beautiful skies to add them to my collection.
With this goal in mind, I take pictures every time I see an exciting sky and put them in my collection for later use.
With one click of a button, Luminar will make a perfect mask, select the sky, and replace the old sky with the sky of your choice. Of course, to make it as realistic as possible, you have to be choosy about the replacement sky and approximate the actual situation as much as possible. For example, putting a very bright blue sky in a wet and rainy scene is unrealistic. You should also pay great attention to which side the sunlight is coming from or what the atmosphere of the image is. It will look utterly fake if you put the sun on the wrong side.
To help with this, Luminar allows you to move the sky horizontally or vertically or mirror it to place the sunlight on the right side. Furthermore, the sharpness and luminance of the sky can be tweaked. You can also adjust the mask that was generated automatically if needed.
A number of these things can, of course, also be realised in Photoshop since some recent updates, but Luminar still stands out for its ease of use and that relighting the scene, taking into account the new sky, is a piece of cake with Luminar.
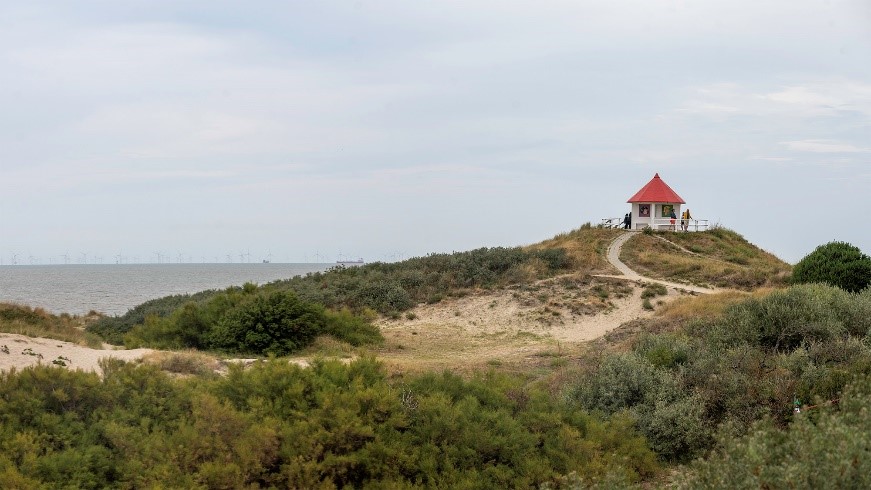
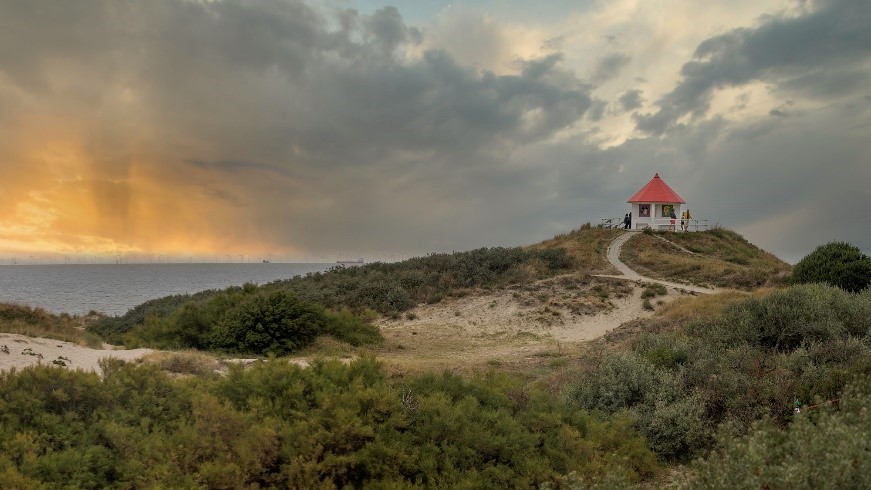
In this landscape panorama, I have replaced the original sky (top )photo) with a sunset sky (bottom photo), ensuring that the sun is on the left where the actual sunset usually takes place. You will also notice that the scene has been relighted.
As a landscape photographer, you will also appreciate that Sky AI produces realistic reflections of the sky in the water and allows you to fine-tune the scene’s relighting according to the sky’s colours.
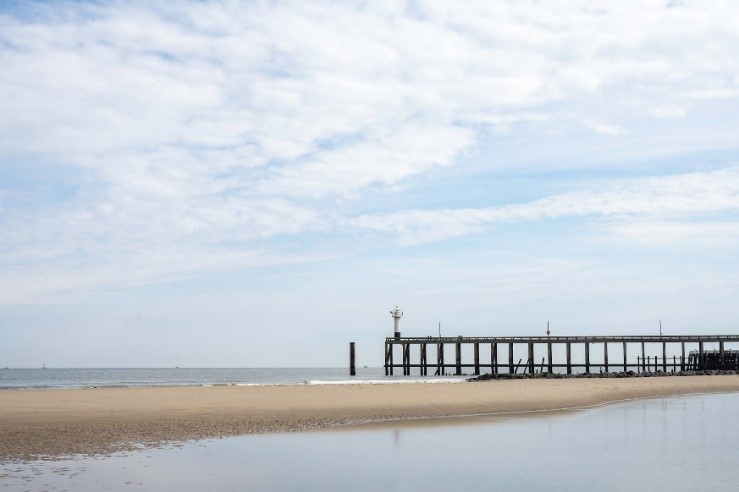
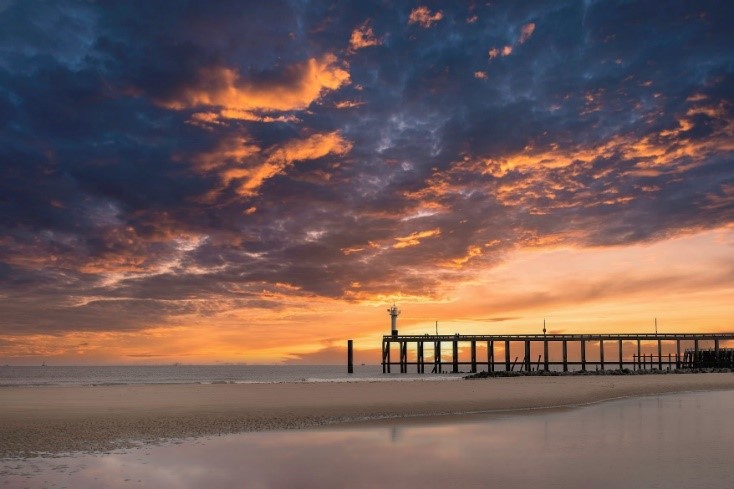
For illustration, I have replaced the original sky (left photo) with a striking new sky (right image). In the example, the sky nicely reflects in the water in the front. You can obtain this effect in only a few clicks.
Erase AI
The Erase AI tool will work non-destructively and match the original pixels’ texture, lighting, and shading.
Under the Erase tab, landscape or cityscape photographers will find an exciting feature: “Remove powerlines.” Sometimes, you can’t avoid powerlines in your scene. Unless you want to document their presence, you will often try to leave them out of the frame.
Removing powerlines from your image in Lightroom or Photoshop is very time-consuming, but Luminar Neo can do the job with one click. Of course, depending on the number of cables, it goes faster or slower. Nevertheless, the result is very satisfactory, though sometimes not 100% perfect. But in most cases, you can manually remove minor defects easily in Luminar or the more difficult ones in Photoshop. And all that in much less time.
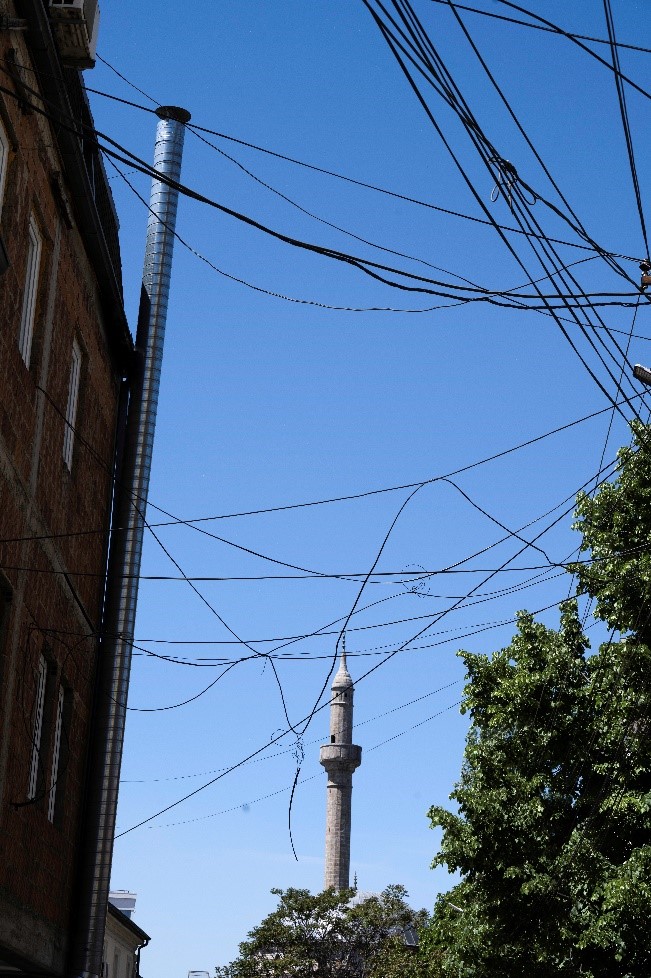
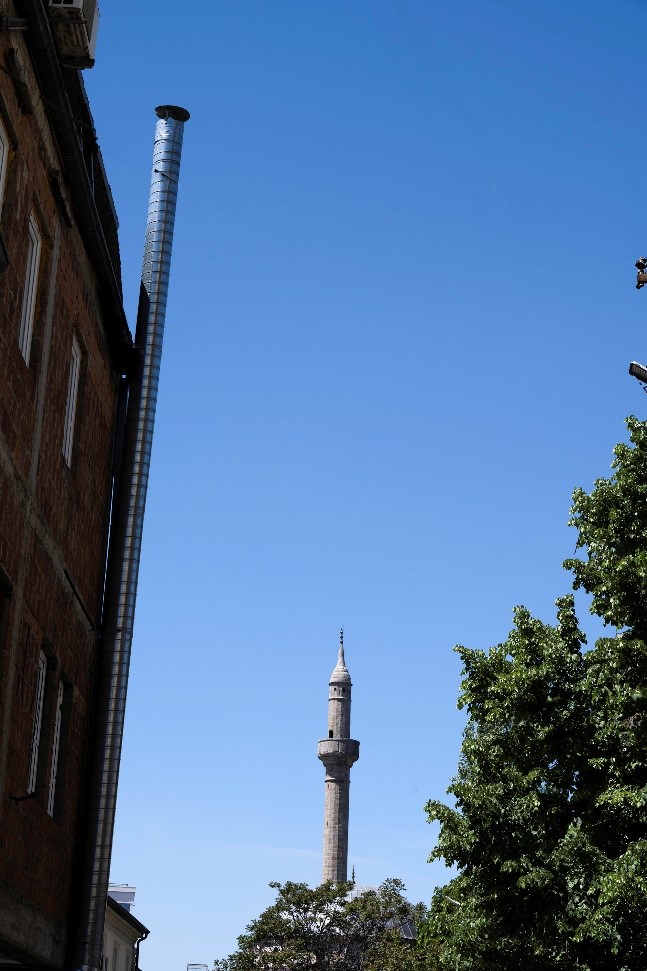
This photo of a cityscape will not win a beauty contest or photo competition. Still, it was the perfect example to illustrate the real power of Luminar Neo and Remove Powerlines AI. With one click, all visible powerlines disappeared.
Many photographers will benefit from the “Remove Dust Spots tool” to remove dust spots on the sensor. Of course, this can be done, spot by spot, with erasing or cloning in Photoshop or Lightroom. However, Luminar Neo will automate that for you and remove unwanted spots. ‘Remove Dust Spots is a real-time saver. One can use the Erase tool to clean up the few spots it may miss.
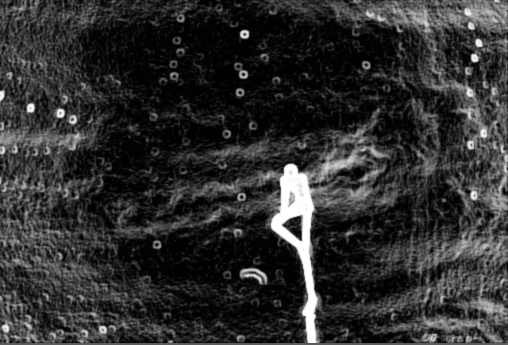
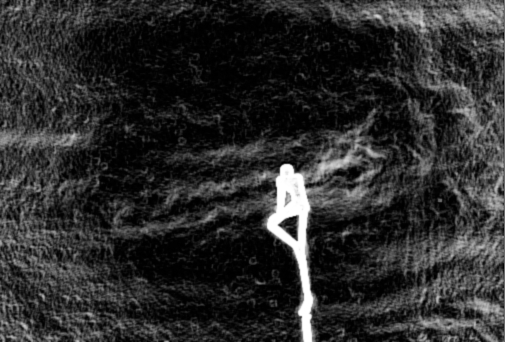
To illustrate the power of dust spot removal in Luminar Neo, I took this picture on a rainy, misty day with minuscule droplets on my lens. (Picture on the left) You see the view in Lightroom with the spot removal tool and having switched on visualising spots. In Lightroom, you will have to remove each spot, one by one, manually. In Luminar Neo, you only need one click! (See the result in the right photo).
Crop AI
Under the crop tool, you will find what is necessary to adjust the cropping of your image to the desired format, horizon alignment, rotate the image, etc. But also an exciting tab called Composition AI. Based on AI, this will suggest adjustments to the composition and crop of your landscape photo. Which you can accept or ignore.
If you are looking for more information on the composition of landscape photos, have a look at my blog: composition-in-landscape-photography
When you doubt where to put the horizon in your landscape photo, go to the blog horizon-in-landscapes
Structure AI
The Structure AI tool will adjust an image’s detail and clarity. This means increasing the details or, the other way around, smoothing details by impacting the contrast.
The beauty of the system is that artificial Intelligence will recognise the faces of people in your photo and avoid applying structure to the facial skin, making them look older. This is very ingenious and produces natural results. The boost slider emphasises more minor details. So be careful, or you will have a less pleasing HDR-like look.
Atmosphere AI
Many landscape photographers try to avoid fog in the broader landscapes or, on the contrary, hope to include misty conditions to add to the atmosphere while maintaining a realistic look.
Atmosphere AI adds realistic fog effects, considering the picture’s depth. Producing such an effect in Photoshop is time-consuming and laborious. For example, the dehaze slider (to delete or add haze) in Lightroom will impact the global image.
Atmosphere AI offers the choice between 4 types (fog, layered fog, mist, and haze, fog and mist.). On top of that, you can play with the amount of the effect and, with one slider, adjust the depth of the atmospheric effect (moving it forward or backwards in the photo).
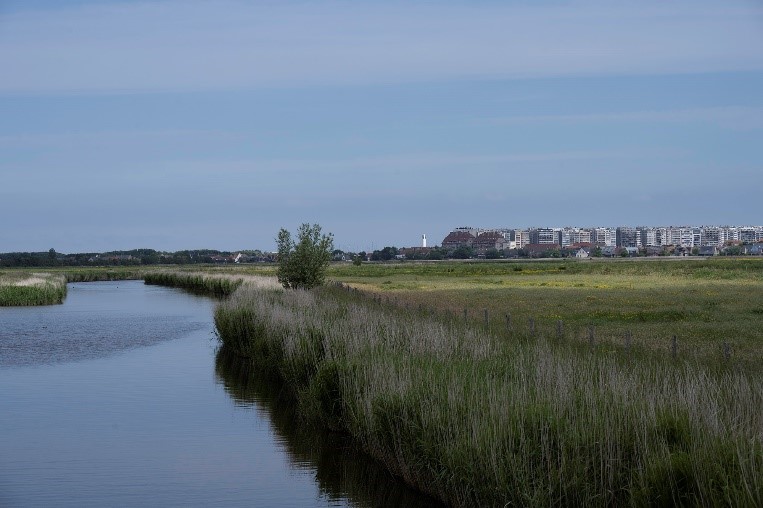
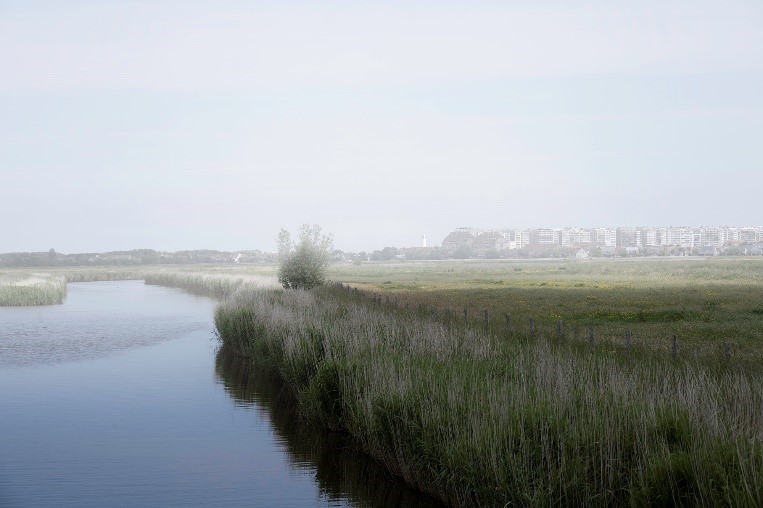
I have introduced this landscape with the help of ‘Atmosphere AI’ mist and a touch of foreground fog, adding an entirely new atmosphere to the photo. With the sliders, you can push the mist forward or backwards.
The weather can have a significant impact on the atmosphere of your photo. If you want to learn more? Please have a look at my blog weather-and-landscape-photography
Relight AI
The Relight AI will give control over the lighting in a picture. For example, based on a 3D map of a photo, the tool can spread light naturally in 3D space across a 2D image, producing photorealistic results.
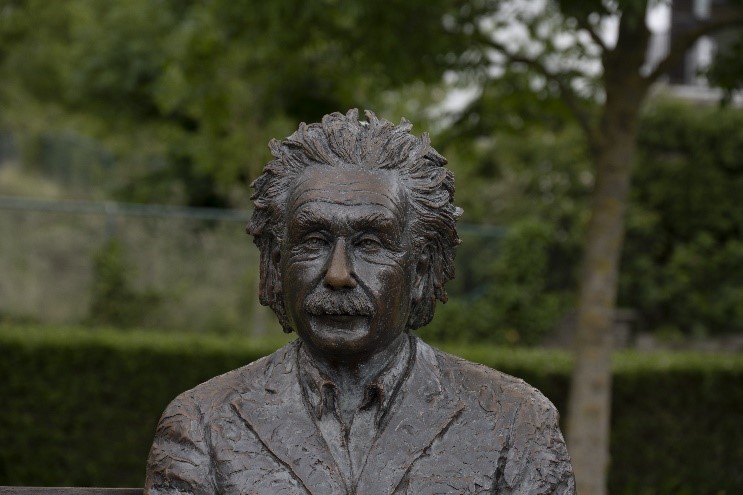
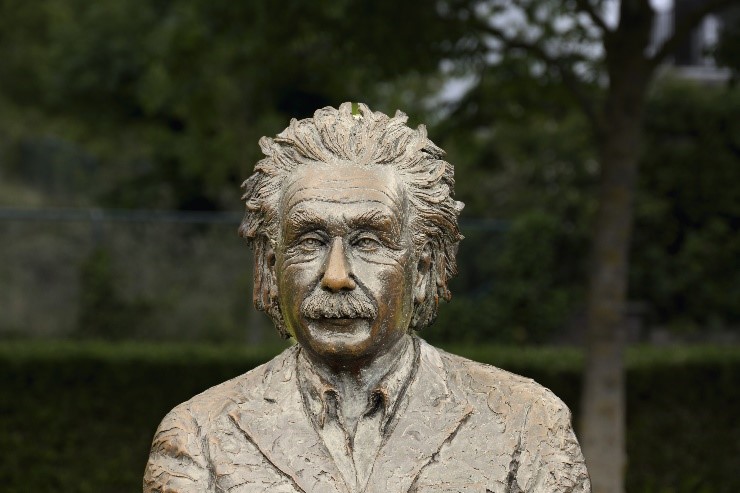
Here I used Relight AI to brighten the foreground and darken the background without making selections before tackling the light. In addition, the depth slider gives you control over where the transition lies between the front and the back.
This can be helpful when you do not have the ability to set up light sources. With the tool’s sliders, you can increase or decrease the amount of light in the foreground or the background. You can even decide on the transition point and control the colour temperature.
Mask AI
Under each tool, you will find mask opportunities. When you press masking the first time, you will see a small animation while the image is being analysed. Mask AI will automatically recognise people, skies, architecture, means of transportation, flora, water, mountains, natural land, and artificial land in your image and give them a separate mask.
The masks generated for you are good, even if the system sometimes makes mistakes. But have no fear; there are always ways to adjust the mask, for example, with the brush tool that allows you to add or subtract pieces to the mask, just like in other post-processing programs. Masks can also be inverted.
The masks will help you to apply a particular tool or effect to a specific area. This means you do not have to use a particular effect on the total image. I hope to demonstrate this in more detail in a future blog.
Portraiture and Face AI
The following tools are of little use to landscape photographers and are more oriented to portrait photographers, but once you have tried them on people in your landscapes, you will want to know more about them.
Learn more about having people in your landscape photos here: people-in-a-landscape-photo
The Face AI tool automatically and selectively targets a person’s face, eyes, and mouth using face recognition technology. It can even recognise side profiles.
I always use Face Light to adjust the face’s lighting without impacting the rest of the photo. This is very handy if you did not use a flash or reflector. I do not use the Slim Face slider to make a face proportionally slimmer, but it’s there if you want.
However, Luminar Neo’s real magic will show when addressing the eyes.
Eyes
Since I am not a model photographer, I will not use the possibility to change the colour or overall look of the iris. On the other hand, Iris Visibility, Iris Flare, Eye Whitening, Eye Enhancer, Dark Circles Removal, Red Eye Removal, and Improved Eyebrows will give your subjects’ eyes an extra spark.
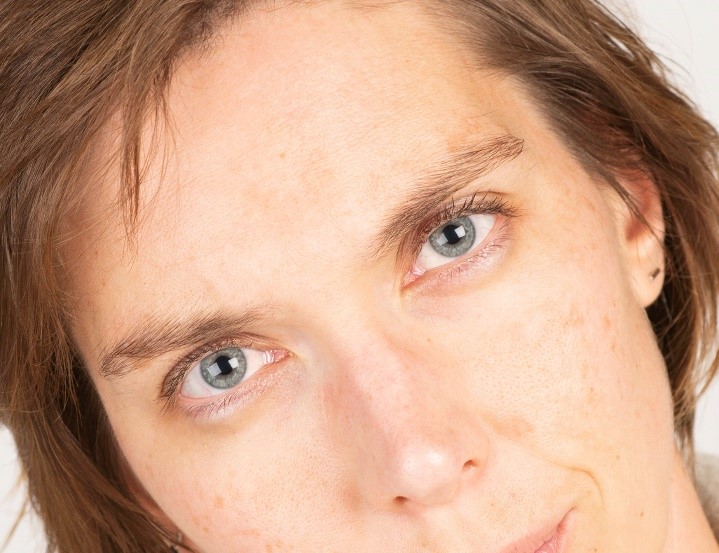
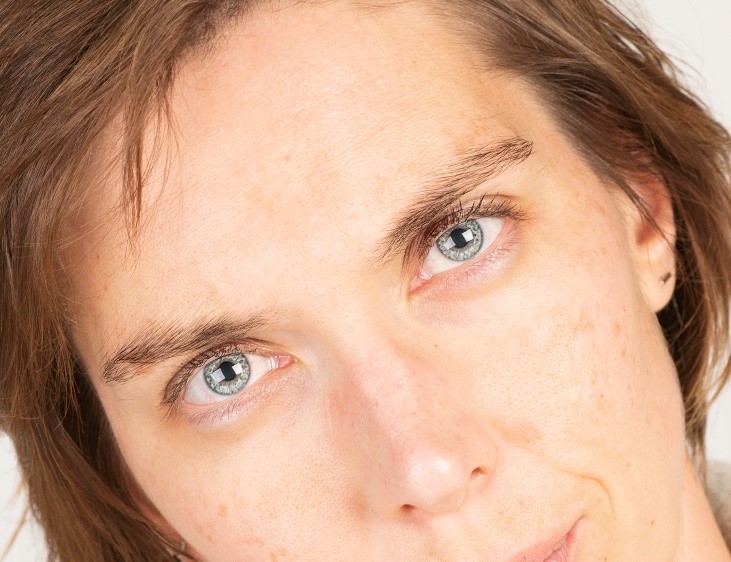
Eyes AI make the eyes more alive (left before – right after)
Skin AI
The Skin AI tool can automatically enhance and retouch a person’s skin and eliminate various imperfections.


In this self-portrait, I used Skin AI and overdid this a bit to illustrate that your portrait can look completely different with a few clicks.
Portrait Bokeh AI
It is possible, however, tough to simulate the defuse background, taking into account depth in Photoshop.
Luminar Neo recognises people in the frame and can simulate the bokeh effect regardless of the lens or lighting conditions. Furthermore, you have control over the active area of the mask and define where the diffuse background will start.
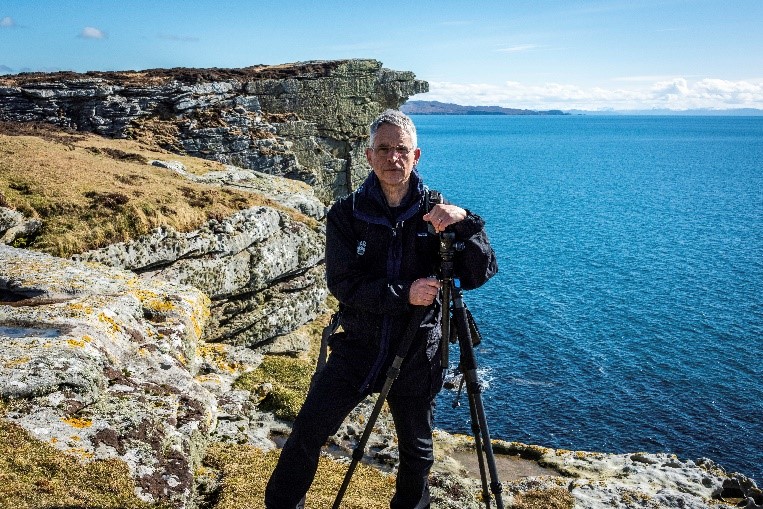
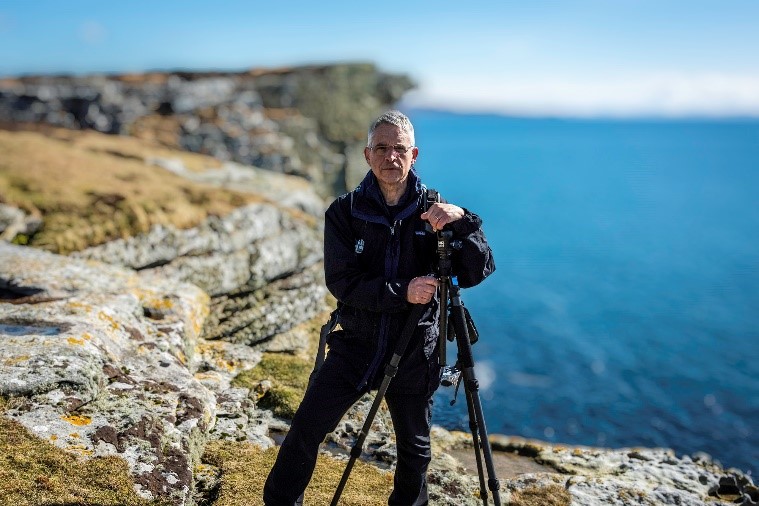
In this self-portrait taken in a Scottish coastal landscape, I applied ‘Portrait Bokeh AI’ to add blur in the background. With the sliders, you can impact the blur’s intensity and move the depth field forward or backward. For illustration, the intensity of the blur was a little bit overdone. However, as you can see, the effect is realistic because the foreground where I stand is still sharp, and the blur only starts to build up behind me.
Learn more about bohek in your landscape photography here: bokeh-and-blurred-background-landscape-photo.
Portrait background Removal AI
This feature is not typically aimed at landscape photographers, but admit that now and then, you want to replace the background of your subject with one of your lovely landscapes. Or you want to put a subject from another photo in your photo as a focal point.
By creating masks, portrait Removal AI will automatically remove the background behind your subject in a photo with just a single click. Of course, there are occasions when the mask isn’t perfect, but you can mainly adjust the imperfections with a refinement brush. Also, automatic person detection is not always excellent in Photoshop or Lightroom.
Presets and extensions
Luminar comes with a set of presets, and the system will make suggestions based on the picture’s content. But that is a topic for a future blog.
Luminar Neo also offers the possibility of using layers, which might be interesting when making composite pictures or adding textures.
Workflow
My typical workflow starts in Lightroom because I rely heavily on its library module. I also make the first adjustments, like white and black points, contrast, shadows, highlights, etc., in Lightroom. Then, I move to Photoshop to use the layers and smart layers and, from there, to Luminar Neo via the filter menu. Later, I go back to Photoshop, back to Lightroom. But if you use Luminar Neo as a stand-alone program, you can make all your adjustments in Luminar Neo.
I can choose the most appropriate application for a specific issue. For some, I prefer Lightroom. For others, I need Photoshop, and here and there, Luminar Neo will make my life easier as a photographer with AI.
You can add up the different tools in Luminar Neo and even apply the effect a second time.
Finding a workflow that gives you the desired result, what is the most convenient for you, and in which workflow you feel most confident. For example, you will find that one tool will give better results for some photos, but for another image, it might be in another application.
Conclusions
Artificial intelligence can no longer be denied and will, step by step, make more of an appearance as it did recently in Photoshop with new selection options and neural filters, for example.
Luminar Neo is a post-processing tool that can replace Lightroom or Photoshop or offer additional time-saving tools for the more demanding photographer. No more do you have to spend hours increasing or decreasing brightness or contrast levels, carefully making tedious selections, and constantly changing background and foreground. Instead, AI in image editing software like Luminar Neo has reduced these tasks to a matter of seconds or, at the maximum, a few minutes.
Luminar has the great advantage of working quite intuitively. With a few sliders, you can have considerable impact and control.
I hope that this blog has made you curious to learn more about Luminar Neo.
For more information: ….


Leave a reply