A landscape photographer spends a lot of attention on the composition and of course, you want your picture to be as sharp as possible. Or should I say acceptably sharp?
Sharpness helps to provide depth to your landscape photo. Especially for larger prints you need critical sharpness.
In this blog, I will provide you with not less than 14 useful tips to get sharper landscape photos. I hope you enjoy them.
Tip# 1. Start to use a tripod
1) Choosing a tripod
The most obvious and easy thing you can do to add stability and sharpness is to use a tripod. Many amateurs complain about the weight to carry a tripod around but nothing else than a good camera tripod will help you achieve consistently sharp landscapes.
In your lifetime as photographer, you will probably have to buy several types of tripods before you find the right one. Many start with a cheaper version because of budget restrictions, but soon you discover that those do not always offer you the desired stability. You will have to make a choice based on budget, weight, and maximum and minimum height. So many factors to take into account. If you love macro photography you, might one that allows you to come as close as possible to the ground. If you hike into the mountains, you might like the lighter weighted carbon versions. When you like working in hard windy conditions you will need a sturdy pair of legs. If you wander a lot in rivers or the coast, they need be water-resistant etc.…
There are many brands around that offer good quality and they provide a range of choice of designs.
For my own work I use a sturdy carbon and waterproof Sirui tripod. But there are occasions when I want to travel light. Then I use a smaller and lighter travel tripod that can fit in my suitcase or backpack.
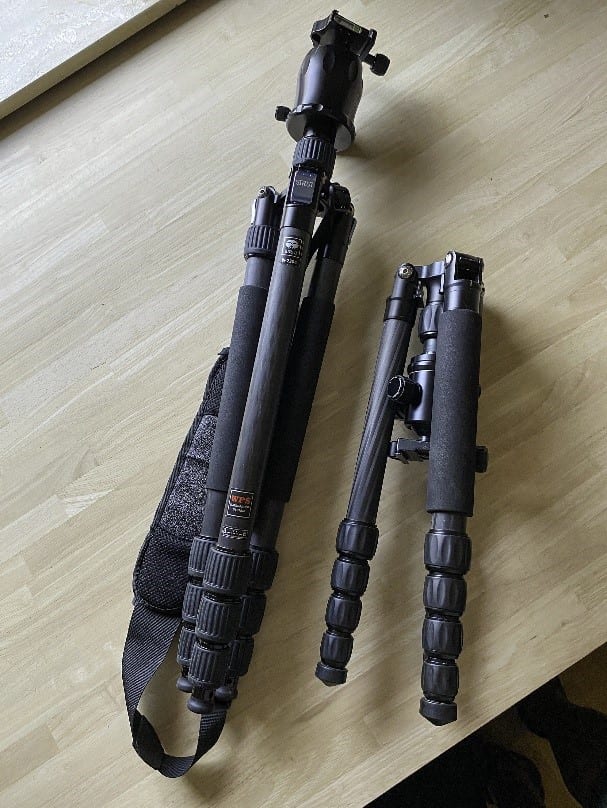
2) On your way with a tripod
Make sure that everything is tightened-up properly and that legs are locked and the head hasn’t loosened. When walking around it happens a lot that the head slightly loosens and that is of course not good for stability.
Windy weather can destabilise your camera, particularly if you are using a long lens or have a filter system with filters attached to the front of the lens. I already experienced this when a gush of wind tripped over my tripod and smashed the camera on a rock in the Scottish Highland. Try to stabilise the tripod as much as possible by splaying the legs wide enough and pushing them firmly down into the ground (providing the ground is soft) or hang a heavy bag at the centre column. Some tripods have a hook at the bottom of the centre column. This extra weight makes the tripod even more stable. But be sure not to let your bag just swing freely in the wind because this will only increase the possibility of unsharp images. Also swinging camera straps in the wind can have the same effect. It is best to remove the camera strap. If you’re on a beach, make sure to press the tripod a little bit further into the sand, so it doesn’t sink in when you’re taking the shot.
If you are on a wooden pier or bridge, make sure that you’re not walking around on it while you are taking the photo, because this will influence the camera to sway a little bit.
Sometimes you see people holding their tripod while shooting. This is often a sign that the tripod is not sturdy enough and there is a fear of it being blown over. Holding the tripod can also cause small vibrations. Any vibration will result in a slightly blurred picture, so preferably, do not touch the tripod while shooting.
Tip# 2. If you insist to shoot hand-held
When you do not have a tripod at your disposal. It’s simply just a matter of keeping the camera as steady as possible. Try to find a makeshift tripod. We’re surrounded by objects that can make perfect natural tripods. Rest your camera on a wall or a pole. Also, bracing yourself against a wall or any other solid structure will help steady your body while shooting hand-held.
There are a few tricks to make sure that you optimize sharp images and the first one is to have a good firm grip on the camera. Grab the camera with one hand on the lens and another one on the grip and keep the camera as close as possible to your body. Personally, I definitely prefer to keep the camera at eye level and look through the viewfinder. Doing this, the camera can rest on my face and this helps to keep the camera as steady as possible.
Use your breath to your advantage. So, when you breathe out, wait a second and take the shot and then inhale again. Instead of just shooting away while inhaling. Take the shot when there are no vibrations, and then you’re good. You can of course also make sure that you put on again the option image stabilisation, when you are hand holding after you switched it of when using a tripod.
Tip# 3. Turn off image stabilisation
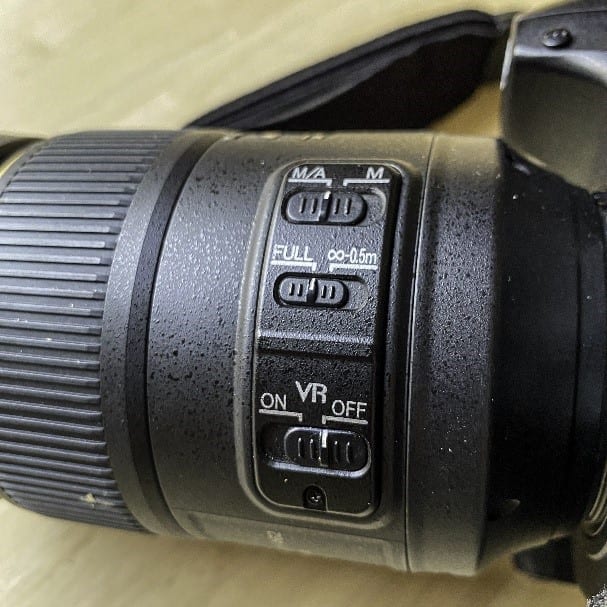
The stabilisation on your lens can do wonders for handheld shots but it is better to switch off optical image stabilisation when your camera is securely fixed to a tripod. Your equipment will try to stabilise movement that is not present and this might soften image quality.
However, I have experienced a few times that in windy conditions when even a sturdy tripod is not enough to keep the camera from shaking, you can actually turn image stabilisation back on again. But it is something you need to figure out yourself on location. In such conditions, it might be better to stop shooting and return on another occasion.
Tip# 4. Go for a small aperture
You will require a large depth of field if you want front-to-back sharpness in your landscape photos. Of course, focal length, camera-to-subject distance, and point of focus all together will influence the perceived depth of field, but the aperture is the primary method of control. Depth of field (DOF) refers to the zone of acceptable sharpness in front and behind the point of focus. With smaller apertures, you will obtain a wider depth of field than large apertures.
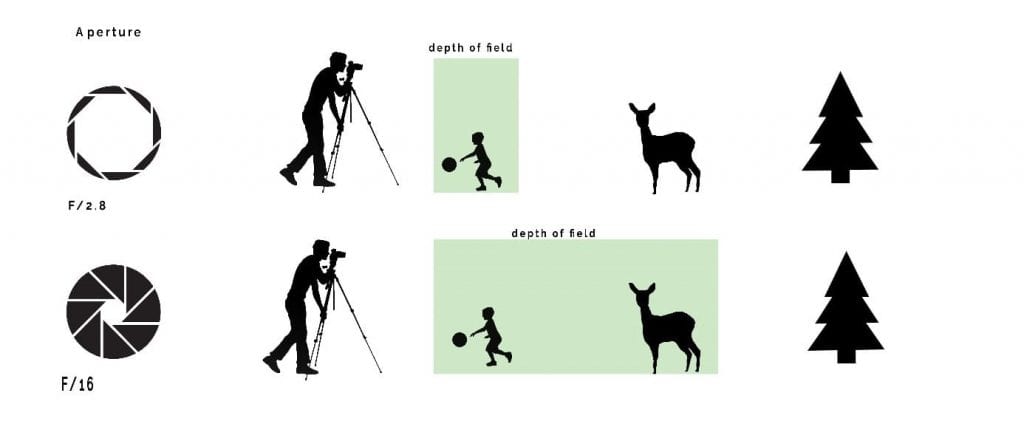
Aperture is measured in F stops and it can be a little bit tricky to understand because when you increase the F stop number, you make your aperture, smaller. That might sound a little counter intuitive. However, there is some logic behind this because your F stop number is actually a fraction. So, when you have F 4 it is actually 1/4. And when you have F 8, it’s 1/8. Obviously 1/8 is less than 1/4 so that is why your aperture actually gets smaller, when you increase the number.
Be aware that your sensor size plays a role. Crop cameras and anything smaller than a full-frame lens tend to have the sharpest point of their native lenses, at a little lower, F stop value. So, let’s say, F 6 compared to an F 8 on full-frame.
Due to the effect of diffraction, the option of the smallest aperture of F 22 or F 32 is not the best choice. The reason for this is, that when light is passing through the aperture, light is striking the edges of the diaphragm blades and diffracts or scatters, and this is affecting image quality. Diffraction tends to make your images more ghostly or more soft.
As explained in previous blogs, a good starting point is a mid-range aperture in the region of F 11, but some optics may actually perform best at around F 8. You need to experiment with this for your particular lens, to find the so-called “sweet spot” where your lens performs at its sharpest.
Tip# 5. Use the hyperfocal distance
Do not be frightened by the terminology. A lens can only focus precisely on one vertical plane at a certain distance and sharpness gradually decreases either side of this distance.
From experience, we noticed that the depth of field extends one-third in front of this point and two-thirds beyond it. That means that, if you focus too close or too far away, you will waste some of the depth of field available to you.
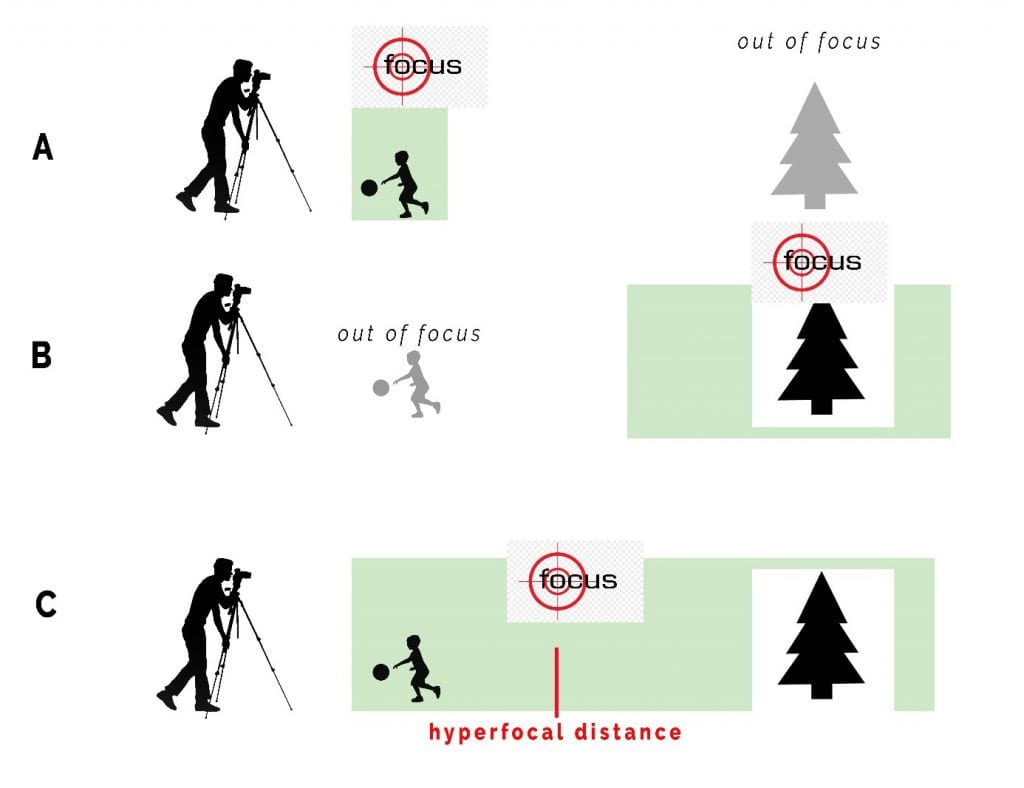
The hyperfocal distance refers to the point at which you focus to maximise depth of field. – If you focus at the hyperfocal distance, you get the largest possible part of the scene sharp. – When using the hyperfocal distance, you will render everything from half of the hyperfocal distance to infinity acceptable sharp.
We need to understand that, for every focal length and aperture combination, there is one distance that will maximise depth of field and this is the so-called “hyperfocal distance”. When you focus on this point, you will take advantage of the full extent of the depth of field. Sounds complicated? Lucky for us, there are hyperfocal charts and also very useful apps available for different sensor sizes. These charts or apps will help you calculate this optimum point. One of those apps is Photopills, but there are more Apps available in the Apple Store. Just enter the selected focal length and aperture, and the app will calculate the distance you need to focus on and also show the near and far limits.
Now suppose you are out in the field without such a chart or App. In that case, it is always a safe choice to focus on roughly one third into the distance. However, in practice, you will often want more sharpness in the foreground. In landscape photography, we often have to deal with objects or lead-in lines in the foreground that we want to have sharp. Therefore, you will often focus on the main subject and/or the foreground in your photo.
Tip# 6. Focus via Live View
Under normal circumstances in landscape photography and with the sophistication of modern auto-focus systems, the viewfinder works perfectly. But with subjects that need precise focusing like in macro photography or in architecture photography then focussing via the Live view in combination with manual focus will be the best solution. If necessary, use the magnify button and check and adjust the sharpness of your image. Scroll around the scene, from front-to-back.
If light reflecting off the live view screen is making it hard to see you could try using a loupe that fits to the live view screen.
Tip# 7. Keep your finger from the trigger
Using a tripod is only the first step for shake-free results. Pressing the shutter might cause a small tremble and so soften the image quality.
Do you need to spend a lot of money on remote triggers? Well, that depends on what you want to do and how often you will use it. But your camera is already equipped with a perfect solution. Select your camera’s delay or self-timer option to set to a short delay of a few seconds. In this way, you can eliminate any risk of you causing movement when taking photos. This ensures that when you hit the shutter, you can remove your hand and make sure that the camera is all steady when it takes the shot.
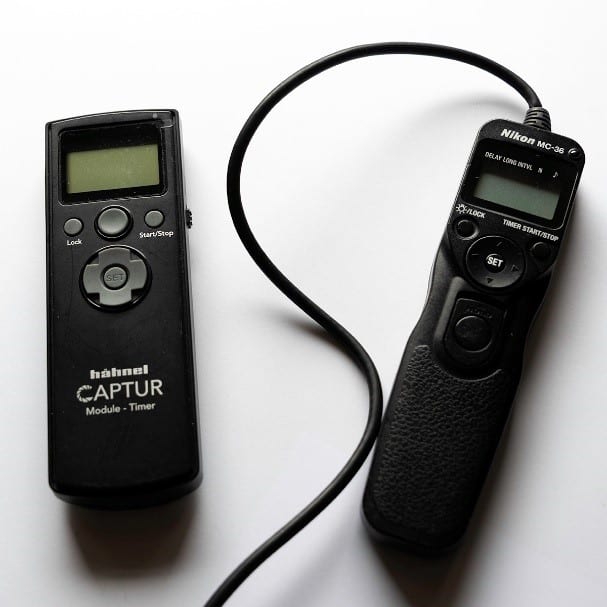
The use of a remote trigger will be a good solution as well. This remote device is connected to the camera via a cable or via infrared to release the shutter. For some cameras you can use specific Apps to trigger the camera from your phone. There are simple and cheap solutions available as well as sophisticated and more costly versions with build-in timers for long exposures and solutions for time laps etc…
Tip# 8. Mirror lock-up
If you use a mirrorless camera or when you take photos with Live View activated, you can skip to this part. However, if you use a digital SLR with viewfinder keep reading.
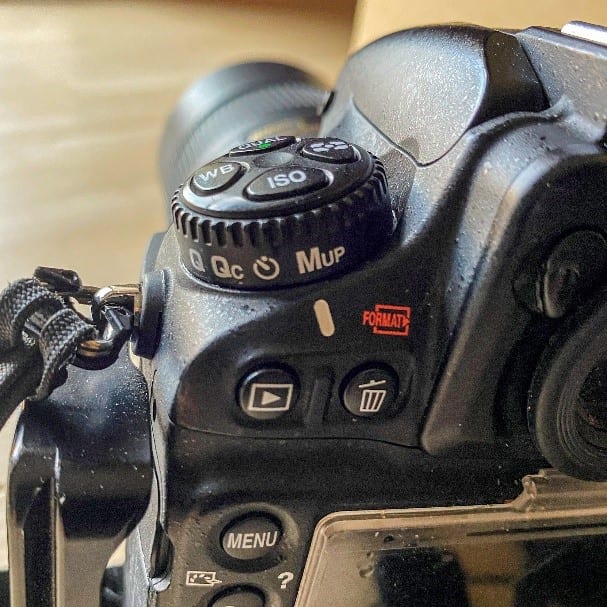
When you take a photo, you can clearly hear the internal reflex mirror swinging up and out of the light’s path towards the sensor just before opening the shutter. This action can cause tiny movements with impact on the image sharpness. You can avoid this by selecting your camera’s Mirror Lock-up function (consult your manual). Some entry models might not have this possibility. With Mirror Lock-up enabled, you will have to press two times to take a photo. The press will lock up the mirror, while the second press actually takes the photo. Pause a brief moment between locking up the mirror and taking the photo to enable any internal vibrations to stop. When the mirror is in the locked-up position, you can no longer view the scene through the viewfinder. Using Mirror Lock-up is a useful method to really maximise critical sharpness.
Tip# 9. Use good lenses and keep your equipment clean
Good quality lenses can make a difference to the sharpness of your photos, and more expensive lenses are generally sharper than cheap ones. It all comes down to lens design, the quality of the glass, and how much glass there’s in the lens. That is also why prime lenses, tend to be sharper, simply because there’s less glass in them.
If you compare a professional prime lens, with a professional zoom lens you can observe a sharpness difference at pixel level. Zoom lenses are a wonderful invention and easy to use and they save you weight because you need fewer lenses. However, there is also some bad news because zoom lenses are rarely working at their sharpest at the extreme ends of their zoom range. You might want to test your gear, but you will likely find that any zoom lens is sharper in the middle of its zoom range and not necessarily at its widest or longest focal length. So once again, you will have to make a compromise between the ease of us, the weight on one hand, and super quality on the other. But in many cases, the negative impact will not be so huge and may even go unnoticed if you have a professional quality zoom. However, if you compare a professional zoom lens with an entry level zoom lens, you can usually see quite a significant difference.
Tip# 10. Take off that filter if you do not need it
Filters in front of your lens can reduce the sharpness of your lens. So, when they’re not needed, take them off to improve clarity. If you need them, make sure that they are clean because they can easily catch droplets and dust. Therefore, keep a cloth at hand to wipe it off.
For the use of filters see also this articles:
- Handy tips about using filters for landscape photography (part 1)
- Handy tips about using filters for landscape photography (part 2)
- Handy tips about using filters for landscape photography (part 3)
Tip# 11. Increase your shutter speed
When you work on a tripod the shutter speed is not so important but when you shoot handheld it will become important again, especially if there is less natural light like for example in the shade of a forest. A faster shutter speed is less susceptible to movement, so increase it as far as you can. You probably have the question: “How far must I increase the shutter speed?”
There is an easy rule of thumb that says to use a shutter speed of at least “1/focal length”. So, for a 100mm lens, you would want to use a speed of 1/100 of a second or faster.
When you increase the shutter speed the amount of light that comes in will decrease so you can either open up your diaphragm or increase the ISO. Because of the desired depth of field, you could be limited in changing your diaphragm and then only ISO can be increased.
Tip# 12. Focusing in low light conditions
In low light situations, focusing can be hard. This happens often before sunrise and after sunset and in forest under het leaf cover. The cameras autofocus may take a long time to search and then fail to focus because it is simply too dark. The same can happen during the day when working with filters or when it is heavily cloudy or shady and you work with a small aperture. Remember this is also the case if there is almost no contrast in the scene like in water, sky or snow. The autofocus does not function properly then. There are a few possible solutions to this:
- Work on live view. On some cameras, the autofocus still works well in low light when you work on live view.
- Open the aperture to its widest margin. More light will fall on the sensor and the autofocus module will work better. After focusing, set the lens or camera to manual so that the focus does not change again. More importantly, don’t forget to set the aperture back to the desired value.
- Remove the filters. If you are working with filters like the big or super stopper, there is no other option than to temporarily remove the filters. Most likely you will be able to focus then. Then repeat what we just described in the previous option. Before removing the filters, don’t forget to check which focal length you have chosen. When you replace the filters, the settings may change.
- If none of the above works, focus manually. When looking through the viewfinder, make sure the eyepiece is properly adjusted.
Tip# 13. In the air?
We are not photographing in vacuum conditions. The farther away your subject is from your camera, the more distance that light must travel through the air to get to your lens. Haze, smoke, fog, smog, heat, turbulence and more can prevent you from getting a sharp image of a distant object. Get closer, if you can. Or wait for different conditions.
Tip# 14. Sharpening photos in editing software
If images are blurry, they are most of the time useless. Of course, some photos are intentionally blurry for effect (intentional camera movement). But in general, sharpness can make or break a photo.
Even photos taken with the most care while keeping vibrations to a minimum while shooting, most photos can still benefit from a bit of sharpening in a program such as Photoshop or Lightroom.
There are very good sharpening programs as stand-alone software or plugin versions like Topaz Sharpen AI ® available working based on the newest AI technology.
Of course, a completely unsharp photo can never be restored to a complete sharp image. There is only so much you can do in post-processing.
The concept of focus stacking, (combining photos in photoshop with different focal points) will be treated in a separate blog.
Conclusion
Focusing remains the greatest challenge in landscape photography but achieving tack sharp images isn’t impossible, it does involve adjusting as many “small things” as you can. Each might only make a tiny difference, but the cumulative effect will result in sharper photographs. Sometimes you have to push it to the limits and that is the fun part of landscape photography; “knowing what you are doing and learning from it”. After a while, you will notice you do not need to think about it anymore, unless you start shooting hand-held.
As always, I really do appreciate your reading of this blog. If you have any questions definitely leave those in the comment section below and I guarantee I will get back in touch with you.
Leave a reply